Saturday, May 25, 2013
Corsair Force Series 3 SSD Notebook Upgrade Kits
Corsair Force Series 3 SSD Notebook Upgrade Kits
[originally posted at Corsair blog]
Quite frequently when talking about computers, I use the term "chimple". I believe that ideally computer upgrades in general should be so simple that a chimp can do them — aka chimple. My reasoning is that if something is in fact so simple that a chimp can do it, that means that I have a decent shot at pulling it off too.
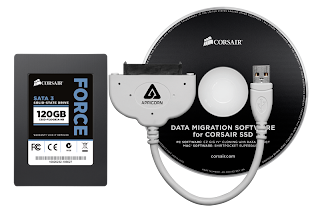
Our new Force Series 3 SSD Notebook Upgrade Kits are the epitome of chimple. The kit includes an SSD, a USB connector, and the Corsair Data Migration software CD.
For those users that have never replaced or upgraded a drive in their computer, you typically have three basic options. You can do a clean installation of your OS, you can restore your OS from a backup, or you can go the chimple route and simply clone your existing drive. With the EX GIG IV software, you can make an identical copy of your existing drive thus eliminating the need for working with the OS. Once the clone is done, you remove the old drive and install the new drive. Of the three options, a clone is typically the most simple and fastest way to add a new drive to your machine and get it running. And heres how you do it.
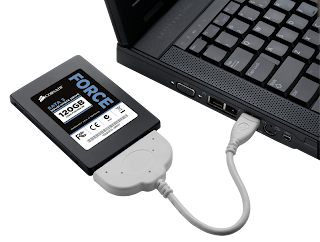
Initially, your SSD may not show up in Windows if it is not initialized. This is not an issue and the software will see the SSD without initializing it. Connect the Apricorn USB to SSD adapter to the Force 3 120GB SSD, then connect it to a USB connector on your computer.
Insert the CD and if the Autorun function does not start the program, simply view the files on the disk in Windows Explorer and start the application.

Once the application is started, you will see the EZ GIG IV startup options screen. Start EZ GIG IV.
Youll need to accept the EULA to continue.
After you accept the EULA, select "Lets Get Started".
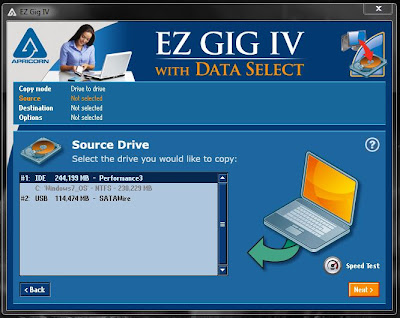
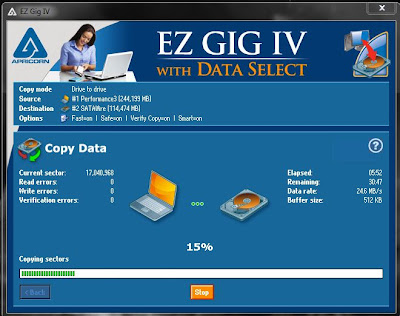
Select your source drive and then select next. In this example, my source drive is drive C: and it is listed as drive # 1.


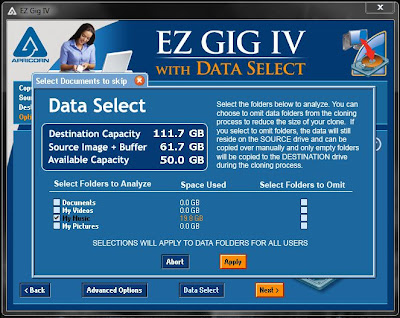
Data Select is a neat option that allows you to select data to be omitted from the clone if needed. This will help speed up the cloning process. For example, if you wished to omit the My Music folder as I have here, you would omit 19.8GB from the cloning process. You can then manually add any omitted folder at a later time while operating the OS from your newly cloned drive.

Once your clone is complete you can repeat the process with the Another Copy option, Quit EZ GIG IV, or check the details of the operation.
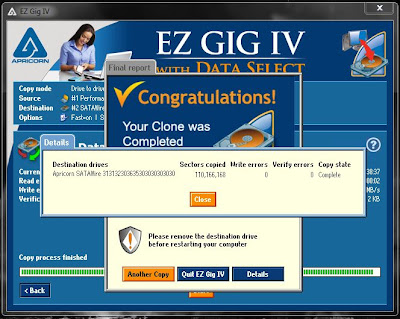
Once the clone is complete, youll need to remove your old drive and replace it with the new drive. Youll most likely need a small Phillips or "T" head screw driver for this.
Most notebooks/netbooks are fundamentally the same yet subtly different in their layout. If you are not familiar with how to replace a drive in your specific unit, please consult your manual or consult the manufacturer. Here, weve used a Dell Inspiron as an example. Be sure to unplug your power supply and also remove the battery before beginning.
Find the panel covering the drive bay and remove it.

Once this panel is open, youll need to remove the existing drive. Most drives are going to sit in a small retention cage. Remove the screws (circled in red) holding the cage and carefully pull the drive out of the machine by sliding the drive away from the SATA interface. Again, if you are not sure of this procedure, be sure to use the resources provided to get the proper procedure for your machine.
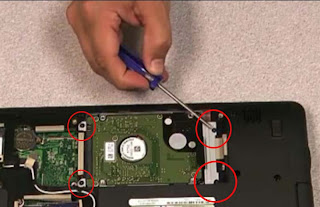
Once you have removed the old drive from the system, remove the drive from the retention cage. Place the new SSD into the retention cage in the same orientation as the original drive. Then, carefully slide the drive back into the SATA interface in the direction of the red arrow and replace the screws holding the cage. Then, replace your cover, reinstall the battery, apply the power supply if needed and power up. Once it is up and running, your OS should look exactly as it did with the previous drive and also have the blazing speed of an SSD.
In this video Jeff Checchi walks you through the Force Series 3 SSD Notebook Upgrade Kits features, as well as the installation on a new ThinkPad laptop:
This process really is exceedingly chimple. In my testing, my laptop was still usable while this operation was running. Of course, any data you add or changes you make after you start the process will not be included in the clone and moved to the new drive.
Now, here is some information about some Corsair Force Series 3 SSD Notebook Upgrade Kits:-
Force Series™ 3 Notebook Upgrade Kit 240GB SATA 3 6Gb/s SSD Technical Specifications
Friday, May 24, 2013
Samsung Series 3 350U

Samsung has launched three new series of laptops named as Samsung 350U. The 350U weight just under three kilos and 0.8 inches thick, while the processor is a Core i5 with a 640GB HD, 12.5 inch anti-glare screen and a. Large enough battery to keep blowing for more than eight hours, in fact, the big difference between this laptop and the same size of Series 3 shipping here in the states are the color options. While all Americans have the same gray metallic, our friends across the Pacific can choose black, silver or pink (you know, for the ladies). The details concerning the device specifications are discussed below.

Samsung Series 3 350U Laptop Specifications:
- Second generation Intel Core i5
- 12.5 inch, anti-glare screen
- Hard Drive: Up to 640GB h
- Color choices: Pink, Black and Titanium Silver White
- Weight: 1.35kg
- Thickness: 20.6 mm.
Thursday, May 23, 2013
Help Mounting Hydro Series H50 H70 to Socket 1155
Help Mounting Hydro Series H50/H70 to Socket 1155

Why did my Hydro Series H50/H70 not come with Intel LGA 1155 Quick Start Guide?
For Intel LGA 1155, you will want to refer to the Intel LGA 1156 quick start guide — socket 1155 had not been launched when the H50 documention was developed. Place the required parts next to the quick start guide to insure you have no missing parts and follow the instructions on connecting each part. You can also refer to the “How to install Corsair Cooling Hydro Series H50 CPU cooler” video for some extra installation tips for both the Hydro Series H50 and H70.
Why does my backplate not have 1155 marked on it?
Because socket 1155 uses the same quick start guide as socket 1156 and is physically compatible with socket 1156, we will also be using the same mounting points on the backplate. Plug in the metal inserts (part H on the quick start guide) to the correct holes (1156) on the backplate, to make sure it will fit correctly with the mounting holes on the motherboard.

Shouldn’t all four mounting holes on my motherboard align with the back plate?
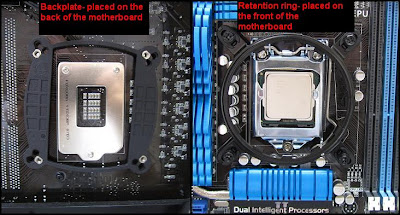
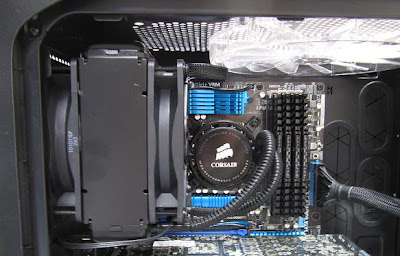
When installing the backplate behind the motherboard, slightly tilt the backplate to one side (see image below). Dont be alarmed by the fact that the bracket is not exactly square with the CPU — this is the correct installation. Once the back bracket is in place, connect the retention ring on the front of the motherboard using part I from the quick start guide.
If my backplate covers resisters, will this cause issues with my motherboard?
Depending on the motherboard, it might cover some resistors, but will not cause any problems or harm your motherboard (see image below).

Once connected, refer to the Hydro Series H50/H70 quick start guide, which will guide you on mounting the fan(s), pump and radiator (refer to the video link above for a more detailed breakdown). Don’t forget to plug in the pump and fans to the fan controller or motherboard fan connectors.
I hope this answers some of your questions about Hydro Series H50 and H70 installation on Socket 1155 motherboards.
This article was originally written by Carlos Pascual of the Corsair blog (http://goo.gl/GDFO2) team on the 13th June 2011. I wanted to share it with you here. All credits go to him for this excellent tutorial.
Tuesday, May 21, 2013
Sony VAIO W Series Eco Friendly Netbook Featuring 10 1 inch Display Launched Review

The Sony VAIO W Series Netbook (aks mini notebook) is ideal for anyone who wants casual computing, web browsing and social networking at their fingertips and delivers the essential laptop experience—email, instant messaging, Facebook, YouTube, Twitter—in a size so small you can take it anywhere.
Talking about its taunted eco-friendliness, up to 20% of the PC/ABS resin used in the cover, palm rest and incidental parts is comprised of reprocessed plastic from DVD and CD waste and it comes with electronic user manual in place of the standard 76-page printed manual to save paper and lastly it is packaged in a reusable carrying case that utilizes 100% recycled PET material (material from plastic bottles)
Sony VAIO W Series mini notebook comes with parental controls built-in so you can create a safe on-line experience for kids. Featuring Kidzui and Online Family Norton software, kids have the freedom to learn, play, search and discover sites on the Internet while it gives parents the tools to manage the sites they visit.
KidZui is a Web browser, search engine and online playground for kids ages 3-12, and it’s included on the Sony W Series mini notebook computer. Kids have the freedom to learn, play, search and discover over 2 million games, websites, videos and photos on their own. KidZui has the largest number of games, websites, videos and photos reviewed by parents and teachers anywhere.
The Sony VAIO W Series netbook is equipped has a 10.1-inch LED backlit HD widescreen display with 1366×768 pixel native resolution powered by integrated Intel GMA 3150 graphics card (not the Intel HD) that lets users view an entire web page side-to-side on a single screens. It features QWERTY keyboard, 82 keys with 1.2mm stroke and 16.05mm pitch, built-in MOTION EYE camera and microphone and electro-Static touch pad.
The Sony VAIO W Series mini notebook also features WiFi 802.11b/g/n/wireless networking solution from Atheros, integrated Stereo A2DP Bluetooth technology, memory Stick PRO (Standard/Duo) media slot with MagicGate functionality and ExpressCard /34 slot.
The VAIO W Series mini notebook also spacks 250GB hard drive for all your on-screen media – movies, photos and videos – just like that of a full-size PC. And with a long battery life, users can get up to seven hours of use on a single charge.
The VAIO W Series netbook comes with VAIO Media plus Multimedia Streaming software, a media sharing application that lets you wirelessly stream content across DLNA®-enabled devices throughout your home network and users can also stream video, music and pictures from their W Series to their compatible primary PC or PLAYSTATION 3 and vice-versa.
Key Features of Sony VAIO W Series Netbook
- Intel ATOM Processor N280, 1.66 GHz
- 1 GB DDR2 SDRAM
- Up to 500GB Serial ATA, 5400 rpm hard disk
- 10.1-inch wide WXGA TFT colour display, 1366 x 768 native resolution
- Intel Graphics Media Accelerator 950
- An isolated keyboard with springy and responsive keys making it comfortable and easy to use.
- Genuine Windows® XP Home Edition 32-bit with SP 3
- Wireless LAN IEEE 802.11b/g/Draft n
- Bluetooth standard Ver. 2.1+EDR
- Integrated Webcam with Microphone
- Multimedia Card Reader
- Colors: Vibrant colors-berry pink, sugar white and cocoa brown.
- 3 Hours of Battery Life
Weighing just 1.19 kgs, the Sony VAIO W Series eco-friendly mini notebook comes in sugar white with a translucent green interior and comes preloaded with Microsoft Windows 7 Starter operating system and is available in India for the starting price of Rs. 29,999 with one year warranty. ( www.laptopviews.com )